“Katniss has QUALITY in every conceivable category of assessment. Congratulations on a magnificent build. Aloha!”
(Kimo Hussey, Hawaii)
FAQ
An important note on pickup installation
I use different bracing from most ukes; the installer must look inside and make sure the installation will not drill through any braces. (Cool tip: on spruce tops, a bright light placed inside will show the brace positions if the room is dark enough). Not every bracing pattern will necessarily work for every pickup model. If you tell me what pickup you want before I build your instrument, I can design for that pickup, plus at least one other reliable alternative.
Performers have widely varying needs of course, but (as of October 2024) for a good clean sound I prefer a K&K Aloha Twin paired with a top-flight DI and parametric EQ. This provides an extremely dependable pickup with no batteries to die in the middle of a performance (or remember to change–yay!), and puts the ever-changing and amazing electronics world outside your beautiful instrument. If possible I would combine it with a good external microphone…and a good sound person to take care of you!
Caring for your instrument
Here is a good start: Your instrument is safest in your hands or in the case with the latches fastened. Don’t leave your instrument–in the case or out–where a baby wouldn’t be comfy and safe: not in the car alone, in the hot sun or chilling breeze (whether outside or through a window), over a heater/AC vent or by the wood stove or fireplace, in the garage/attic/basement, with the checked baggage on the airline, with a careless or clueless person, or places where it’s liable to fall or be dropped, bumped, stepped on, tripped over, overheated, drenched, stained, lost, or otherwise exposed to harm.
Exception: your baby might enjoy a warm bath, but don’t bathe your instruments;-).
Temperature and humidity are VERY important, and I discuss them at length below, but ideally you want a comfortable indoor temperature with relative humidity around 45%. This humidity will make your skin happy by the way; if you have chapped lips (during heating season for instance) that’s a warning of low humidity. Especially beware of rapid large changes in temperature and humidity, the most stressful of all situations. If you suspect that your instrument got very hot or cold (please don’t let that happen), it is safer to leave it in the case as it re-adjusts; overnight might be a good idea.
In the car, it’s often better to keep your instrument in the passenger area with you, where it’s comfy and easy to grab when you get out. Stow it where it won’t fall or bang around (behind the seat is often good), covered with light-colored cloth to avoid prying eyes and hot sun. A light-colored blanket or quilt will help hide the contours of the case (and dog hair explains the blanket to nosy lookers).
Use a soft cloth to wipe down the instrument after playing, especially where sweat accumulates. Stores sell fancy cloths for the purpose, but a worn out t-shirt or other soft material works fine. If you sing you’ll probably find a little spit on upper surfaces–a hazard of the front row at some musicals and operas as well! Dampening a soft cloth by breathing on it is often sufficient to take care of this, or a very slightly damp cloth followed quickly by a dry cloth.
You don’t need to “feed the wood” with polishes and oils. At best these are primarily about being shiny, like oil on a body builder or wax on a car, and (believe it or not) about fragrance. If a product actually polishes, it is by definition abrading the finish slightly, and may eventually wear it away. A guitar-specific polish shouldn’t do this if used properly, but they are unnecessary and I haven’t tested them so can’t be sure.
Extremely troubling is that many products–including (notoriously) products that contain silicone (like Pledge), but even on occasion simple waxes–can cause problems ranging from gunky build-up and finish blemishes to genuine repair and refinishing nightmares. Products sold specifically for the fretboard (e.g. Dr. Duck’s Axe Wax, various “lemon” oils) may not hurt if used sensibly and very sparingly, but I haven’t tested them; I don’t wax or oil my instruments; I just wipe them after playing.
Lastly, if something about your instrument seems wrong or even strange, get it looked at. Look for a repair person as for a doctor; you want a sense that you are connecting and communicating clearly combined with competence and meticulousness. In particular: if it’s a structural repair and the shop isn’t planning to use a glue amenable to reversal and further work (hide and fish glues top this list), and isn’t known for excellent work on high value instruments, you should probably keep looking.
Humidity and temperature – IMPORTANT!
If you don’t have one yet, do yourself a big favor and order a digital hygrometer right now. You’ll need it to measure relative humidity (RH), which we’ll explore below. Decent digital hygrometers typically cost $10-20, and I have several. Why?
The biggest risks for your instrument are extremes of RH (relative humidity) and temperature (which are tightly connected), especially when they change rapidly. But while temperature is obvious, typically we are not very aware of RH, nor the critical connection between them.
Dryness–i.e. low RH compared to the RH in which the instrument was built–is the biggest risk; it causes wood to shrink across its width but not its length–a clue to why stress builds up. If this happens fast or goes too far, the wood will crack to relieve the stress, and joints can be stressed or broken as well. My instruments are built at 40-45% RH–a slight bias toward dryness to cushion you against this risk. The risk is not huge at 35% for instance, but low humidity always has risk, and rapid change dramatically compounds this risk.
High temperatures can wreck an instrument’s finish, and (if that’s not bad enough!) can cause glue to creep or fail–for instance slipping or tearing off the bridge, or even distorting the basic geometry of the instrument. Being left in an “it’s only warm” car, in a case in the hot sun, or even in direct sun (indoors or out) is a classic recipe for trouble. The phrase “It’s just for a few minutes…” should sound an alarm in your mind! Geek note: while heat is the main problem here, UV deteriorates finishes and wood over time. Maybe it’s because I sunburn easily, but I pay careful attention to what the sun can hit in my home, including the easy-to-overlook hours that I’m normally gone.
But here’s the sneaky and most dangerous fact: rising temperature creates an instant drying risk. Air can hold moisture only in proportion to its temperature; when the atmosphere cools enough, for example, the moisture falls out as rain or snow. But when temperatures rise–including inside your lovely protective uke case–the RH immediately decreases. Sound the horns: Warning! Warning! If your instrument is heating up in the car, attic, or sun, the humidity is dropping in lockstep, exposing you to all the problems of dryness, heat, and rapid change: cracks, glue and finish failures, velociraptor attacks!
Another critical effect of the temperature/RH connection–initially counterintuitive–is that indoor environments become very dry during cold weather. That cold outdoor air can’t hold much moisture as vapor (even if it’s pouring rain–physics is amazing!), and when your heating system brings it up to a comfortable indoor temperature the RH plummets; commonly to below 30% and often down to 10% in cold climates. Too many people learn this the hard way–get your hygrometer!
Curiously, most air conditioners also dry the air, another reason you don’t want to leave your instrument right by the vent. Depending on the climate, the RH away from the vent may not be bad, but you’ll know for sure with your trusty hygrometer, enabling you to respond accordingly.
We’ve focused so far on rising temperatures and low RH, but low temperatures and high humidity have their own risks. Very cold conditions can cause finish cracking. High humidity (whether hot or cold) causes the woods to expand in width, typically raising the action, making playing more difficult, changing the sound, and stressing joints. Glues can fail with long exposure to very high humidity, and in extreme cases molds and other unpleasant things can grow. Just as rising temperatures lower the RH, falling temperatures immediately raise the relative humidity (though the air conditioner may offset this as described earlier).
How to manage this? Get that hygrometer! Knowing the relative humidity guides your response. Don’t let it stop you from playing; your instrument is almost always fine if it’s in your hands. When you’re not playing, put it in the case unless RH is in the 40-50% range (and even then it’s a good idea, for all the reasons listed earlier…though I’ll admit I practice more if I leave an instrument out). If your RH is consistently too high or low, even the case is not enough; it slows the rate of change, but can’t stop it. In that case you have two basic options: adjust the RH either in the room, or just in the case.
The best approach–for you as well as your instruments (plus all your wood furniture and trim)–is to have your living space (at least the room with your instruments) consistently around 45-50% RH. You’ll also enjoy happier sinuses and fewer chapped lips:-). If that’s not possible and the relative humidity in the immediate environment is consistently (or dramatically) below 35% or above 55%, consider using some kind of humidity control in the instrument case when you are not actively playing.
If you need in-case humidity control, I recommend the waterless humidity control packs from Boveda and D’Addario, which both humidify and de-humidify as needed to keep your instrument in the Goldilocks range.
You can of course research humidity control options online, where people discuss them at length. Good stores (Strings By Mail for instance) try to stay up to date with the choices. If you choose an in-case humidifier that uses water, don’t forget that it’s possible to over-humidify, with all the associated problems. Some re-fillable humidifiers are built to hang in the sound hole, but if it leaks the instrument could be ruined. It is safer to keep it in the accessory compartment, with a hygrometer elsewhere in the case (arranged so as not to scratch the instrument).
A word to the wise about the (in)famous “potato or apple in a baggie” approach: spoiled food in your case can be damaging and unpleasant.
By the way, for other brands of instrument (built in more humid environments) the recommended range is often a little higher, but 45%-50% is a fine range for all the instruments I know of.
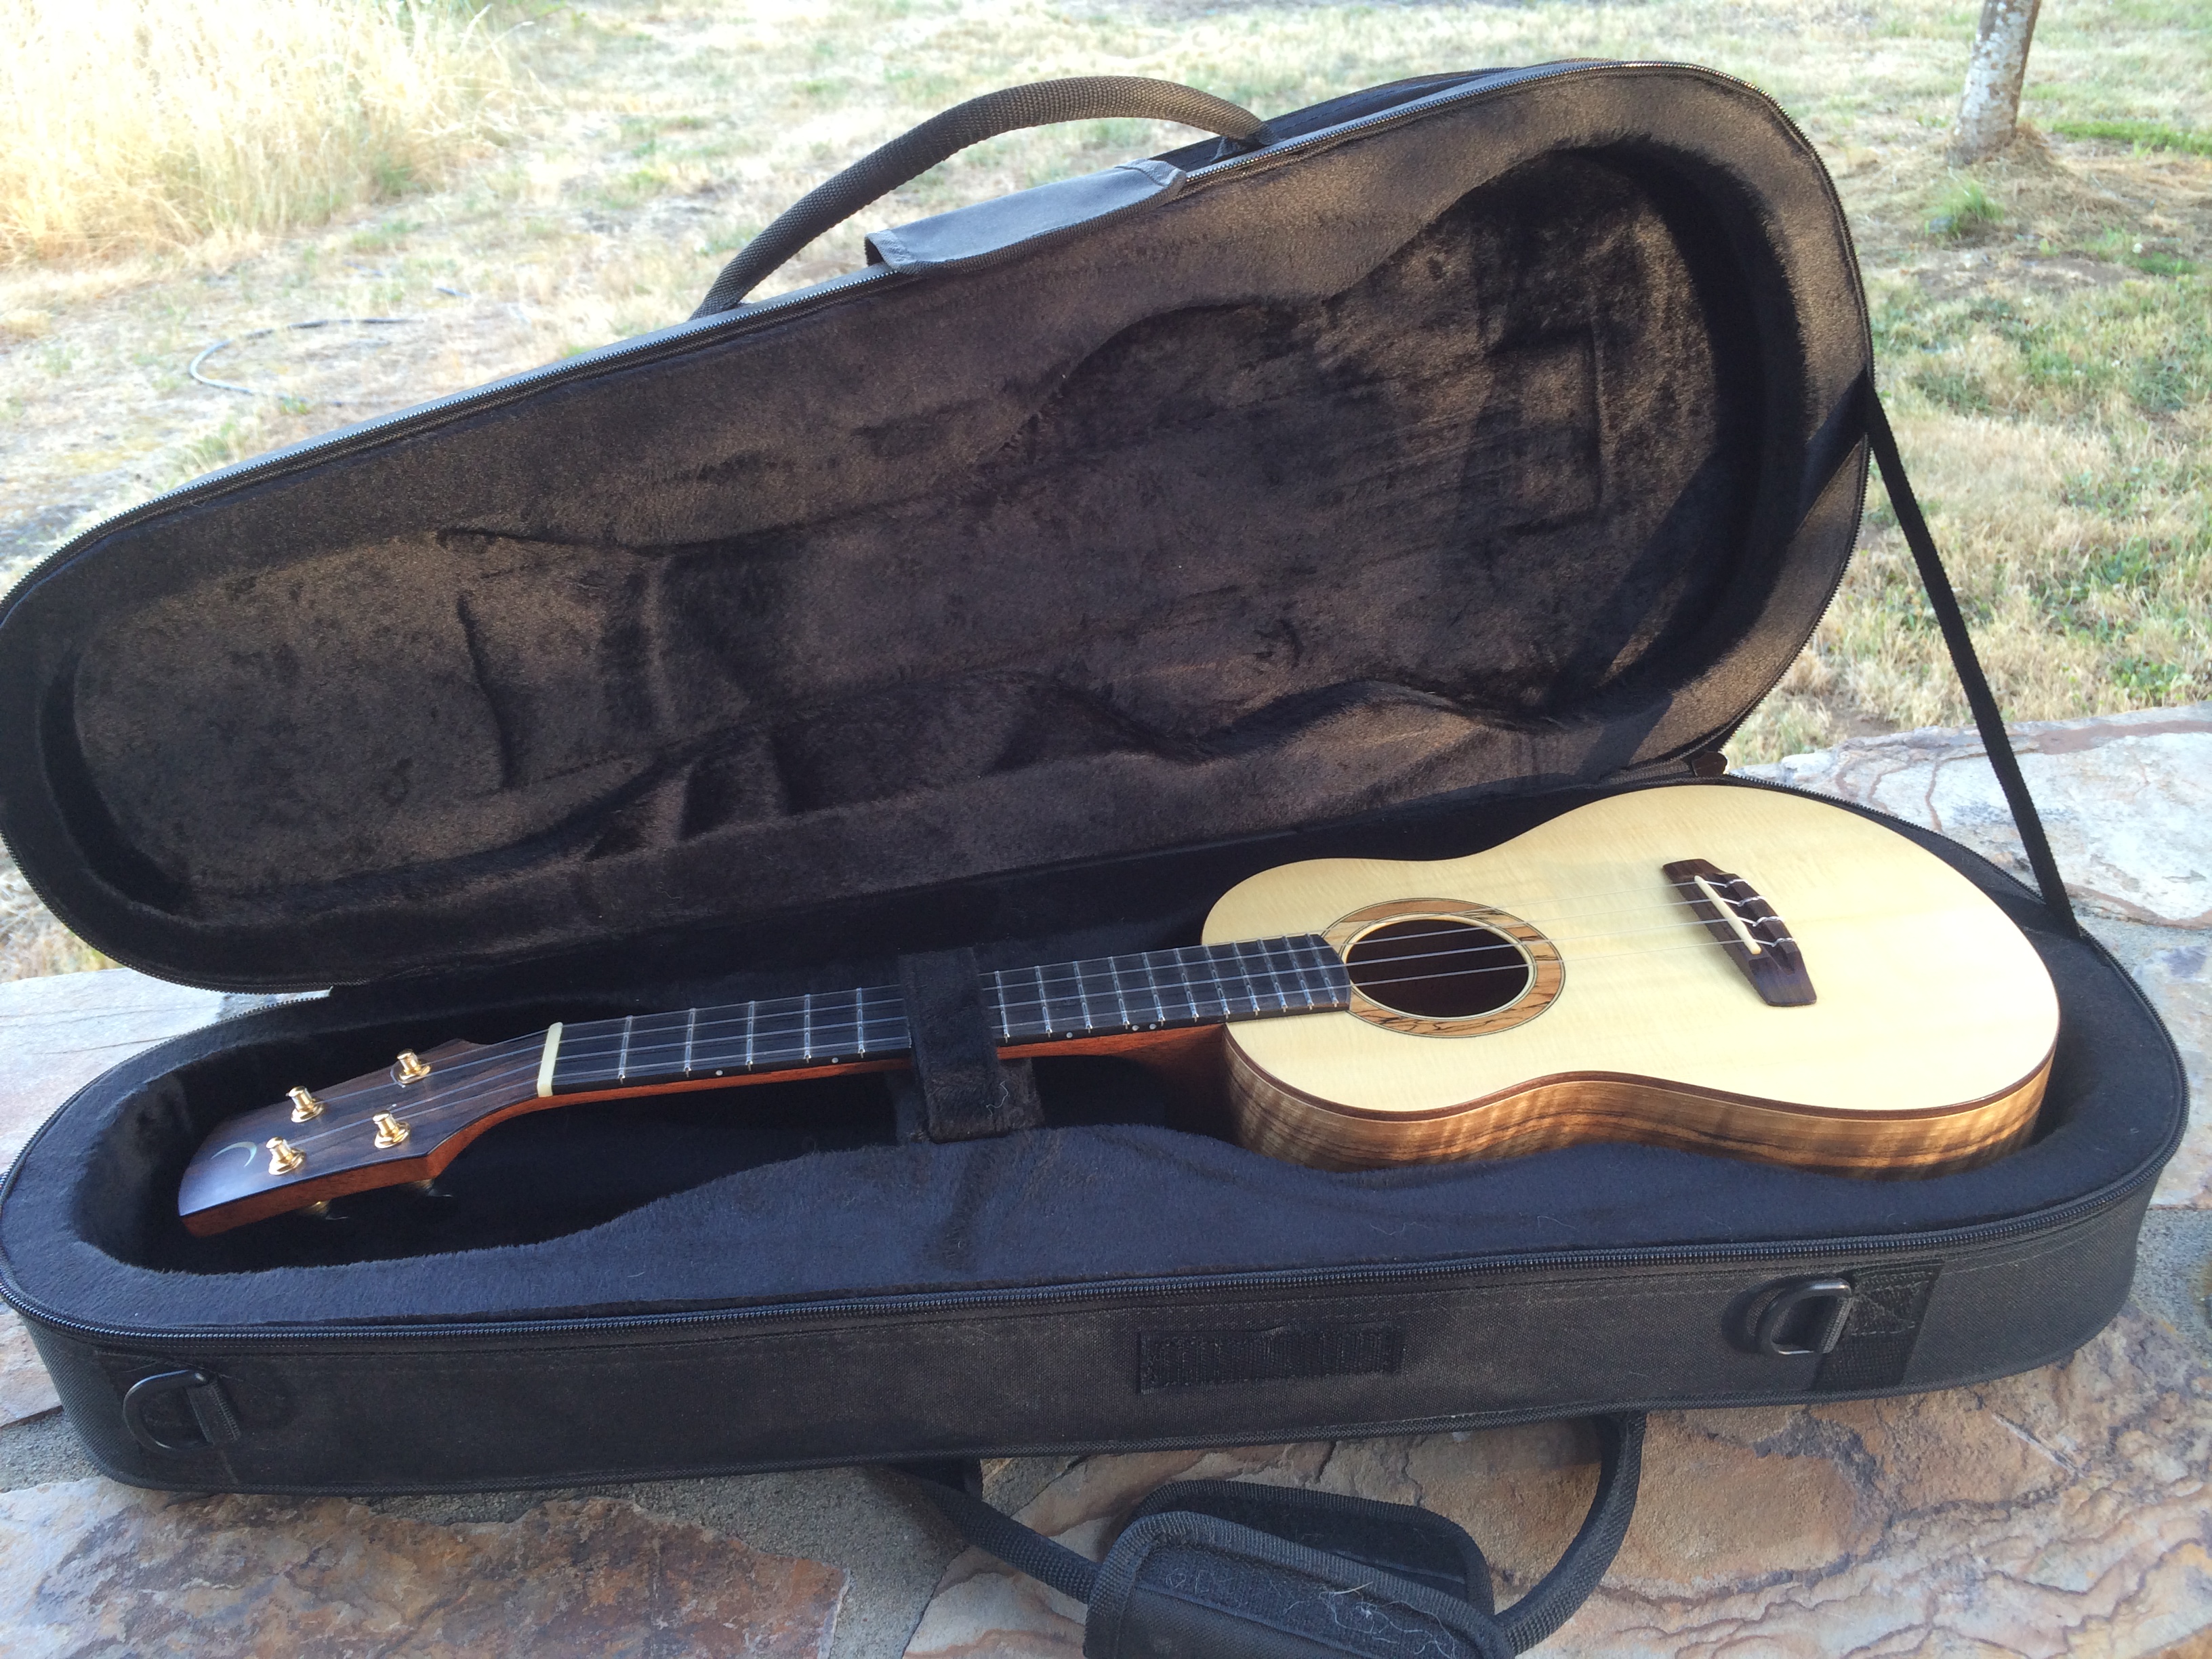
Cases
Hoffee and Calton cases are precisely fitted to your instrument and very tough; a sound investment if you tour with valuable instruments. Light colors slow heat build up when exposed to sun. I also like Crossrock 1000/2000 cases pretty well, (provided you tailor the fit with padding)–strong, suspension design, plenty of latches, color choices including white. The black Oahu hardshell cases with arched tops from The Ukulele Site are solid, though the neck support sometimes needs modification to support the instrument properly. I do not recommend soft cases–no amount of padding helps when someone sits on your case or jams their luggage into an over-full airline overhead.
Playing notes
Playing your instrument in
You bring the wood to (musical) life with your playing; the more you play the better. In turn, by listening carefully and experimenting, your technique will expand, realizing more of the instrument’s potential as well as your own. The player teaches the instrument, and the instrument teaches the player. Some woods have a fascinating “wake-up” period each time you play, but mostly the change is gradual. Something will eventually bring it to your attention, and it will be a nice moment.
“Liberating” the back
The backs of my instruments are built to move and actively contribute to the sound if allowed to vibrate freely. Try it: play with the back pressed against your body–probably your normal playing position–and again with the back held away. Wow!–when it can vibrate there is extra resonance, volume, sustain, and overall yummy goodness. A large percentage of mandolin players employ a Tone Gard for this purpose, and they can be custom made for your uke as well. It’s best to put it on and leave it, so make sure it will fit your case.
Strings
Along with your right hand technique, strings have the biggest effect on tone. There are a bewildering variety on the market, and the only way to find out if you like a set is to try them. I normally ship with a fluorocarbon string like Worth CT, but there is nothing magic about the choice. Note that strings of larger diameter (nylon is typically a little bigger than fluorocarbon, for instance) may require a little work on the nut slots to tune smoothly and sit just right, though you can decide if you like the sound before doing this.
Different strings frequently have slightly different intonation. In fact, different sets of the same strings may change the intonation, and intonation can drift as the string ages. If it becomes a problem, a good repair person can set it right.

Protect the top of your uke when changing strings, especially if it has a tie-bridge; if the knot slips as you bring it up to pitch, it will scar the top right behind the bridge as it flies off, you will be sad, and the repair will forever be visible. Worse yet, the surprise may cause you to drop the instrument, or even toss it across the room if you have jumpy reflexes (he says from sad experience). I cut out a piece of cereal box to fit closely around the bridge and protect most of the top as well, in case you drop the string nippers. Protecting the top with tape seems obvious, but risks pulling up the finish, which will make you extremely sad.
I do the whole job with the uke resting on a towel. Another towel rolled up under the neck helps your access to the tuning machines, or you can make or buy nifty neck rests.
There are many YouTube videos of how to string up, tie the knots, and so forth. It’s a good skill. However, I differ from most videos in that I don’t put any slack in the string when threading the tuner; adding slack just piles up turns on the tuner, which can become a problem. IMPORTANT: on tie bridges it is essential to trap the last twist of the string on the back of the tie block, which you can spot in the picture at the very top of this page.
Choosing between flat vs. radiused fretboard
I recommend a flat fretboard, unless you know from careful observation that you need or much prefer a radius. Some articles and advertisements would have you think that a radius is superior, but it is not as simple as that.
I prefer a flat fretboard for reasons of musicality and tone; it gives the top string more power, thereby supporting the melody line, from jazz and classical to the wildest mashup of Celtic, clawhammer, and Macedonian (all of which I’ve heard in the same session!). The reasons sound a little technical, but let’s take a look:
- A radius results in a curved saddle that is lower at each end, reducing the leverage of the 1st string on the instrument top (and the 4th string too). But wait…we don’t really want less leverage for the melody string🤨.
- Because of the geometry of strumming and rasqueado techniques, the lower 1st string also tends to get less input energy than the middle strings. Less leverage and less input force–where is the “outraged geek” emoji?!

Player technique, material choices, and other design elements can all help counter these, and I don’t want to overstate it. Just listen to Kimo Hussey, who likes all the radius he can get! But for the kind of projection and clarity of James Hill’s tenor River for instance, a flat fretboard is part of that equation, just as it continues to be the standard on even the most expensive concert classical (nylon string) guitars. While steel strings have lots of treble, we need to work harder for it with nylon and fluorocarbon strings.
Now let’s talk comfort…and pain. The first point is absolutely clear: if a radius gives you clear relief from carpal tunnel syndrome or other pain, then don’t hesitate to choose a radius.
But this is not the issue for most of us. We hear that “a radius is better”, and who doesn’t want better, right? Then you pick up a radiused instrument, and by golly it is comfortable–they’re right! But time after time when I suggest a side-by-side comparison focusing on whether the radius is a significant improvement, players most often find that there isn’t actually much difference. They’re both fine. Except…
<Ominous music> Bar Chords.
It’s ultimately an individual issue, but here are some observations. Bar chords are hard for almost everyone while we’re getting used to them and building strength, but with practice they become straightforward–just another technique. In addition, on a 4 stringed instrument–with a finger for every string–while bar chords are a technique you need, they’re not a large part of most playing. Note also that the most common bar shape (Bb on tenor) only bars two adjacent strings, in which case radius is not even a factor.
Then we have the “look at the natural curvature of your finger” argument, which sounds so sensible. But most people, it turns out, can flatten their finger just fine. It’s learning to manage the pressure and exact position that ultimately makes bar chords manageable. Here’s an experience I share with many (all?) players: when I was learning to bar, I used enough pressure to nearly crush the neck (plus paralyze my hand in a matter of seconds) and still didn’t get a clean sound; after practice and time, I used a fraction of the pressure and got good sound. I’m still not exactly sure why, but this is how it usually goes!
There are a lot of “unnatural” things our fingers must do to play any musical instrument–the remarkable thing is that with practice they become not just natural, but mostly unconscious–it’s “The Inner Game of Tennis” effect. When you look at a good player and think “they make it look easy (curse them:-)”, you’re basically right–they practiced and refined their technique (and often adjusted the fingering and position arrangement as well–this is huge) until they are in fact playing with ease, with almost uncanny economy of pressure and movement.
I’ve spent a lot of words on this, but felt it worth sharing that a) this decision has some influence on sound, b) a radius doesn’t make an appreciable difference for a (probably large) majority of players, c) it’s primarily practice that paves the way for ease (and good instruction helps hugely), and d) “features” often have consequences that are overlooked (for a time at least). With this you can order whatever you like and need from a position of strength!
Disclosure and example: One of my steel string guitars has a flat fretboard, the other has a radius, but I don’t notice the difference (despite far too little practice). My classical guitar is flat of course, and I’m happy for all the melody go-power I can get on the high strings. On mandolin however (with 8 tightly stretched steel strings, packed very close together) a radius is dramatically easier, and I wouldn’t be without it. On uke flat is just as easy as radius; once again I want lots of melody power, and in an ensemble I want great clarity in the treble register in order to fill that spot in the mix, not buried among the lower voiced and typically louder instruments. With a fine instrument it is possible to have warmth and deliciousness AND a beautiful top end; having your cake and eating it:-).
Why do you offer the 455mm/17.9″ scale Lyric Tenor?
After designing the 19″ scale (and larger bodied) Grand Tenor with Kimo Hussey, I was smitten by the comfort of the longer scale. However, the extra string tension (in standard tuning) is not for everyone, and on the Standard tenor body 19″ either pushes the bridge too far south for my preference or makes the uke more neck heavy.
I had been doodling with scales that would position the bridge in what is often called the classical guitar “sweet spot” while still keeping 14 frets to the body. Like a math story-problem: “a train leaves Chicago headed east at 60mph…”, except this involved nut, fret, and bridge positions, forces on the top/bracing, and so forth. A conversation with Corey Fujimoto–whose rendition of a Bach violin sonata had earlier blown me away–reinforced my intuition that roughly 18″ would be stellar, and after studying the design of some great classical guitars and translating to tenor ukulele, 455mm/17.9″ popped out–the train arrived!
There are a number of design reasons pointing this way – increased responsiveness and lyricism from the sweet spot bridge location, more input energy from increased string mass and tension, and so forth. However, instruments and wood are so complex that guaranteeing the sound of an individual instrument or feature is a tempting but ultimately false idol…not that folks don’t endlessly try; just check the 25.4″ vs. 24.9″ steel string debate, or similar raging arguments in the classical guitar world!
So I’ll stick to what I can say for sure:
- “Corey likes it” 🙂 – more finger room than a standard 17″ tenor.
- less string tension than a 19″ tenor (and of course more than a 17″).
- a lovely and powerful voice…or it walks the plank! <cue pirate voices>.
- fits most tenor uke cases; not always so with 19″ scales.
- Drop tunings? Yes, for sure. All the way to a flight-overhead-bin friendly baritone.
D6 folks: I don’t suggest the Lyric for the higher and brighter D6 tuning. The top/bracing can take it, but strings are designed to sound their best within a certain tension range, and (after consultation with D’Addario) D6 at 17.9″ is pushing the limit and tempting the gods of string breakage.
Petite Tenors/Concerts, and the Grand Soprano – what’s up with these?
<Summer 2024 note: I’ve taken these off the current model list for now, as I’m pretty well buried with scales 17″ and up.>
Scale lengths are a balancing act: stretches that are within reach balanced against sufficient room for your fingers as you play up the neck where most of the sweet melody notes live. Sometimes a shorter scale is your magic key to greater playing possibilities, yet you want the sonic signature of a larger body than what customarily comes with that scale–that’s exactly what the petite models are for.
The “petites”–the Grand Soprano is also accurately described as an extra-petite Concert–have 12th fret neck-body joins (mostly), which is the standard for modern classical guitar as well as the norm among ukes for decades, including those prized vintage Martins. Steel string guitars also were 12 fret for ages, but migrated during the 20th century to 14 frets, and ukes later followed–I suspect as much for a new feature as for most player’s needs. Interestingly there is now a resurgence of 12 fret neck-join steel strings, especially among fingerstyle players. The effects on sound due to the resulting bridge position can be very appealing. In addition there are somewhat more technical reasons related to short scales that I can describe (in painful detail!) if you ask sometime.
Folks often worry that they will lose critical upper fret access with a 12th fret join, but there is so little fretboard over the body on a uke that those notes are remarkably accessible. To make extra-sure I’m not talking nonsense, I played an arrangement of El Noi de la Mare that constantly goes up to the 12 fret on my old 12 fret Martin uke–it was no harder than on a 14 fret.
I can agree that the highest bar chords are easier with more frets clear of the neck, but they are definitely in the “diminishing-returns” range for tone and musicality because the sounding string lengths are so short. It often sounds better to combine some open strings (or at least lower notes on other strings) with those upper fret high notes, in which case the access is typically fine with 12 frets. Watch those crazed classical guitar players for ideas:-).
I watch players closely–an occupational hazard–and don’t often see a clear need for a 14th fret neck join based on upper fret access, though it does happen from time to time. Of course if you simply love a 14th fret neck join, that’s fine; but if a “petite” scale would help where you play most of your notes, I’d recommend trying out a 12 fret to find out for yourself–it may be a treat, or even a breakthrough.
If you do that, focus on playing comfort rather than sound–we’ll shape the sound with wood and other design choices. Play in all the positions you normally use (or aspire to use). Much chord melody or classical playing for instance has the melody on the 5th through 10th-12th frets; make sure you have enough space up there to feel good. You wouldn’t want to enjoy comfy short stretches in first position only to scream in frustration because the notes are now too darned close when you play up the neck! A balancing act. Note that with experience stretches normally get easier…but your fingers don’t get any smaller.
It was also interesting to me to notice that the petites have scale-to-body proportions closest to classical guitar. But my job is to be a geek.
What tunings work best on the GT?
The first GT for Kimo Hussey was built as a jazzy and more “sophisticated” or “experienced” sounding tenor, with especially warm resonance and extra sustain to support smooth fingerstyle numbers even at slow tempos. I approached the design by scaling down some great classical guitars to balance a 19″ scale, which by lucky coincidence resulted in a baritone sized body. <Summer 2024: I now most often build 19″ GTs with a 13th fret neck join in order to move the bridge to a spot I like better. The more recent Skellig model is designed for a 19″ scale joining at the 14th fret and the bridge in my favorite spot.>
Here’s a way to think about this scale: a typical guitar scale (roughly 25″) with a capo at the 5th fret happens to be 19″. Studying the open notes on our capoed guitar’s resulting 19″ scale, we see that:
- strings 1-4 are…<drum roll>…tenor ukulele in low G tuning. Ta-da!
- strings 2-5 yield pitches from D3 to E4, the range of a baritone ukulele. Amazing!
Wait a minute–“baritone”? Yes indeed; the 19″ scale is great, solidly within the historic range of baritones, and Marcy Marxer loves hers (named Ella); those long stretches are just a bit easier.
Summarizing, a 19″ scale works great for both tenor AND baritone simply by choosing and setting up the right strings. Because the differing setups typically involve changes to the nut (and maybe the saddle) you won’t want to switch back and forth every week, but the GT and Skellig are certainly in a sweet spot for versatility and exploration. A caution: don’t tune baritone strings up to tenor pitches (without checking with me at least); you may stress the top excessively.
Players are also finding that tunings in between tenor and baritone–for example F-Bb-D-G (aka Bb6 tuning)–are delicious; more warm and jazzy than tenor C6, but with more clarity and projection than baritone G6, and with the added twist that chord voicings sound intriguingly different because they aren’t on the usual pitches. Others go lower than baritone, with G2 (guitar low G) the lowest I’ve seen so far. And this is before looking at tunings that depart from the standard “my dog has fleas” intervals, like James Hill’s baritone “b-e-b-e”. Tunings on ukes are far more flexible than commonly imagined.
Now you know the range of tunings that I build the GT and Skellig for–from baritone (or even a bit lower) to standard tenor C6. What’s “best” will be defined by your hands, ears, and musical sensibilities. This is not to pass the buck; different players simply bring different cool and evocative sounds out of the same instrument, which is one of the delightful surprises that makes building so interesting.
What’s that funny script you use?

It’s an Elvish script developed by J. R. R. Tolkien, of Lord of the Rings fame. As a philologist (and quite a good artist) he developed the languages and scripts in great detail.
This phrase is a variation on the last line of the ring inscription, saying “and in the music bind (join) them”, which expresses some of my feelings about music, community, and what I hope to contribute with my instruments. A generous expert in Tolkien languages helped me with the translation and rendering–thanks Maria!
Geek note: I should arguably be using classical mode Tengwar to render this Elven sentiment, but the so-called general mode is beautiful and Tolkien himself used it to illustrate the famed “One Ring” inscription for an early edition book cover. If it’s good enough for Tolkien…
